You can learn more about gradients from this page.
https://helpx.adobe.com/illustrator/using/gradients.html
To create a new pattern, you can use your Swatches panel as well as your Pattern Options panel to create basic and complex repeating patterns that can be later accessed from the Swatches panel and applied to shapes and paths when the path is selected. Pattern editing mode and the Pattern Options panel can be accessed by double-clicking a pattern in the Swatches panel. Refer to Figure 8-58.

Figure 8-58. Updating a pattern using the Swatches panel, Pattern Options panel, and exiting pattern editing mode
However, keep in mind, as mentioned in Chapter 2, patterns underlying text can be a distraction and cause issues with readability, so be aware of this. If you add a pattern to a background, fade the opacity of that selected path using the Control panel. Refer to Figure 8-59.
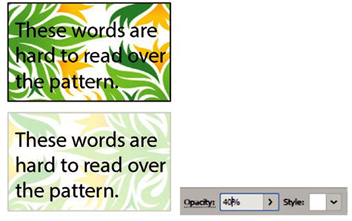
Figure 8-59. Select the patterned object behind text and use the Control panel to reduce opacity when text is hard to read
We will look at them in a bit more detail and how they relate to graphs in Volume 2 should you want to apply a simple pattern to your graph. If you are in pattern editing mode, click the Cancel icon in the upper left if you need to exit this area and mode for now. Additional patterns can be found in the Window ➤ Swatch Libraries ➤ Patterns. Refer back to Figure 8-58.
For additional adjustments of transparency and opacity (0%–100%), remember to use the Transparency panel which you can also access while a shape is selected from your Control or Properties panel. In the Transparency panel, you can add additional blending modes from the drop-down list which are similar to the ones found in the Photoshop Layers panel that will blend the upper color shape with the lower color shape. Apply the blend to the upper shape to see the result. This blend will vary from color to color and give a similar Pathfinder panel effect. Normal is the default, and the other options are darken, multiply, color burn, lighten, screen, color dodge, overlay, soft light, hard light, difference, exclusion, hue, saturation, color, and luminosity. Refer to Figure 8-60.
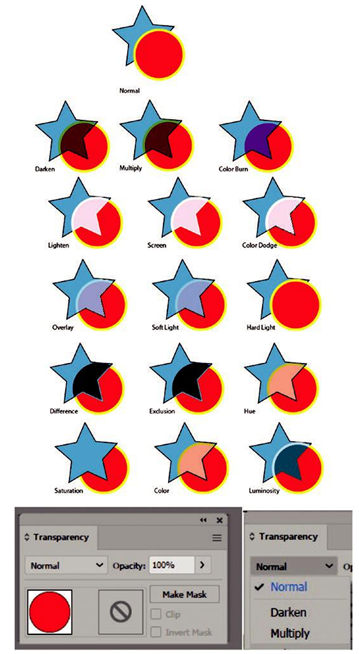
Figure 8-60. Use the Transparency panel blending mode when on selected objects when you need to have parts of the lower design appear through the upper
Refer to my file blending_modes.ai to review examples of these options. Transparency can also have a separate mask applied known as a Transparency mask,
for excluding parts it is similar to a clipping mask for a shape. A shape in this case is drawn on the mask. Refer to Figure 8-61.
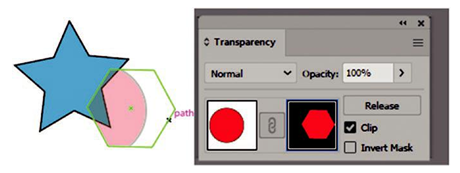
Figure 8-61. Use the Transparency panel to turn a path or shape into a Transparency mask
You can read the details of transparency and blending modes at the following link.
https://helpx.adobe.com/illustrator/using/transparency-blending-modes.html
Tip Use the Transparency Overlay setting, such as a blending mode of multiply, on your mock-up placed/linked image, and place that layer above the layer you want to draw on. Be sure to lock it. You might find this easier to work with when tracing, especially if some of your drawn paths or shapes already contain fills or you want to draw on the layer below with a filled path and make adjustments to paths using the Direct Selection tool if they are already filled. Refer to my file blending_mode_layers.ai for an example. Refer to Figure 8-62.
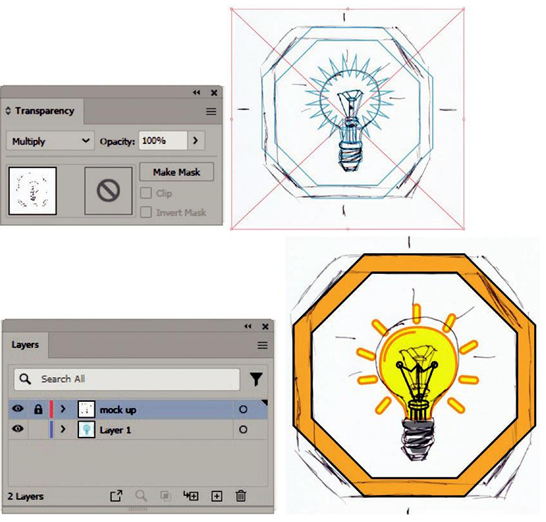
Figure 8-62. Use the Transparency panel and blending modes on an image so that you can trace under it and still see your colors on another layer using the Layers panel